Setting up Google Ads is one of those things that looks simple on the surface — but quickly turns into a mess of keywords, budgets, locations, and policy rules.
Most businesses don’t fail at Google Ads because of bad products.
They fail because the campaign setup is rushed, guessed, or copied from templates that don’t fit their business.
In this guide, you’ll learn how to set up a Google Ads campaign step by step using AI, following the same structured process agencies use — from strategy to launch.
You’ll also see how modern Google Ads AI tools help replace manual work, reduce wasted spend, and turn search engine ads into a repeatable system instead of trial and error.
Watch: Full Google Ads Campaign Setup with AI
Before diving into the steps, here’s a complete walkthrough showing how a Google Ads campaign is created — from business inputs to launch-ready ads:
Why Google Ads Setup Is Still Hard in 2026
Google Ads has evolved fast — automation, smart bidding, Google AI search signals — but campaign structure still matters.
Common problems we see:
-
Wrong campaign goals (traffic instead of leads or sales)
-
Keywords that don’t match budget or intent
-
No negative keywords
-
Budgets set without data
-
Ad copy written without understanding the landing page
This is where AI in digital marketing becomes practical — not as a copy generator, but as a system that understands inputs, constraints, and outcomes.
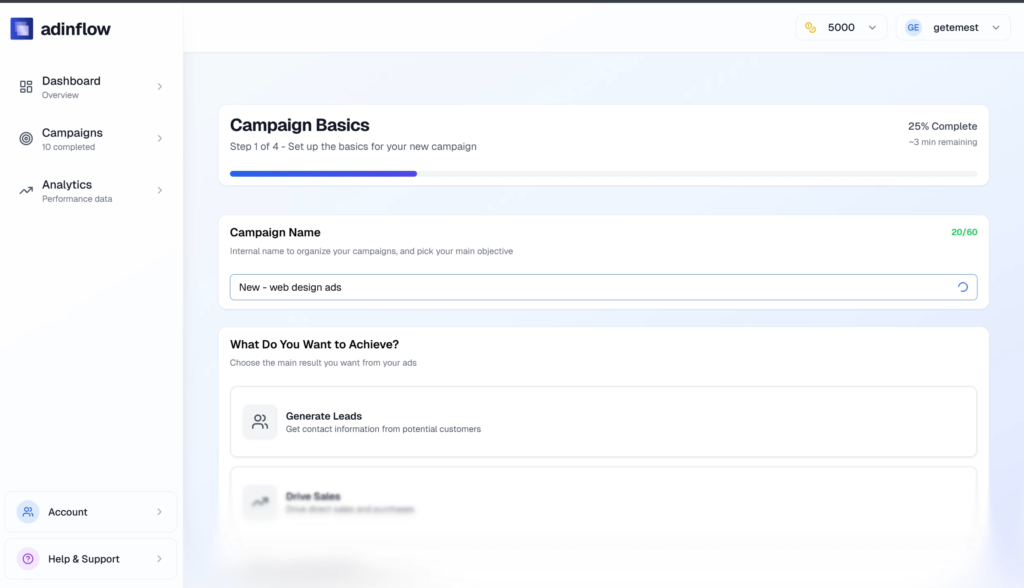
Step 1: Create a New Google Ads Campaign
![]()
Every campaign starts with a simple but important step: naming your campaign.
A clear name helps later when you:
-
scale campaigns
-
compare performance
-
manage multiple markets or offers
Modern Google Ads AI tools use this name internally to keep structure consistent across keywords, ad groups, and ads.
Step 2: Choose the Right Campaign Goal (Leads, Sales, or Traffic)
This choice defines how Google optimizes your ads.
Leads
Best for:
-
service businesses
-
B2B
-
form submissions
-
local companies
Sales
Best for:
-
e-commerce
-
subscriptions
-
direct purchases
Traffic
Best for:
-
early testing
-
awareness
-
top-of-funnel campaigns
Choosing the wrong goal is one of the biggest mistakes advertisers make — and no amount of ad copy can fix it later.
Step 3: Describe What You’re Promoting
![]()
This is where many ad generator AI tools fail — they ask for vague prompts.
Instead, you should clearly describe:
-
the offer
-
the service or product
-
what makes it different
AI content generators perform best when inputs are specific. The same applies to AI ads generators for Google Ads.
Step 4: Select Language and Currency
This step ensures:
-
ads are written in the right language
-
budgets align with your Google Ads account
-
CPC estimates are realistic
Small detail — big impact, especially for international advertisers and Google Ads for business use cases.
Step 5: Add Business Information and Analyze Your Website
![]()
Here’s where AI starts doing real work.
By entering your website and running an analysis, the system can extract:
-
core offer
-
key benefits
-
categories and intent
-
compliance-safe messaging
This avoids generic ads and improves relevance — something even experienced Google Ads agencies do manually.
Related reading:
👉 https://blog.adinflow.com/ai-for-google-ads/
Step 6: Add Competitors (Optional, but Powerful)
Adding competitor websites helps AI:
-
identify keyword patterns
-
understand market positioning
-
avoid irrelevant search terms
This step dramatically improves keyword quality, especially for search engine ads in competitive niches.
Step 7: Choose Campaign Location
![]()
Location targeting directly affects:
-
CPC
-
search volume
-
competition
Instead of targeting “entire countries,” precise locations help small budgets compete — especially for Google Ads for small business.
Step 8: Select Keywords That Match Intent and Budget
Keywords are auto-generated based on:
-
your business inputs
-
website analysis
-
competitor signals
You can:
-
keep suggested keywords
-
add your own
-
remove irrelevant ones
This is where Google Ads keyword tools meet AI decision-making.
Step 9: Add Negative Keywords (Don’t Skip This)
Negative keywords protect your budget.
Common exclusions:
-
“free”
-
“how to”
-
job-related searches
-
informational intent
Skipping this step is one of the fastest ways to burn money on Google Ads.
Step 10: Get AI Budget Recommendations
![]()
Instead of guessing, AI provides three budget scenarios:
-
Starter — conservative entry
-
Recommended — balanced growth
-
Scale — aggressive expansion
These are calculated using:
-
location
-
keyword categories
-
expected impressions and clicks
You can always set your own budget manually — AI is guidance, not a constraint.
Related reading:
👉 https://blog.adinflow.com/google-ads-for-business-ai/
Step 11: Review and Generate the Campaign
Before generating:
-
review keywords
-
check exclusions
-
confirm budget and location
Once generated, the campaign appears in Completed — fully structured with ad groups, ads, and settings.
Step 12: Launch or Export Your Google Ads Campaign
![]()
You have two options:
-
Push directly to Google Ads (one click)
-
Export CSV for Google Ads Editor
This flexibility is critical for teams, agencies, and advanced Google Ads advertisers.
Why AI Changes Google Ads Management
AI doesn’t replace strategy — it removes repetitive execution.
With the right system:
-
you don’t write hundreds of prompts
-
you don’t copy templates
-
you don’t guess budgets
-
you don’t manually structure campaigns
That’s the difference between basic AI content generators and purpose-built Google Ads AI tools.
For Google’s own perspective on automation and ads, see:
👉 https://support.google.com/google-ads/answer/10279057
Try Google Ads Setup Without Guesswork
If you want to:
-
set up Google Ads faster
-
avoid agency fees
-
reduce wasted spend
-
keep control inside one interface
You can try Adinflow for free.
👉 Start your free trial:
https://www.adinflow.com/